Page 2 of 3

Hyundai D4BF engine install

Posted: Wed Oct 11, 2017 10:22 pm
by Growlerbearnz
joebillhill wrote:Woo! Nicely done growlerbear! I'm curious how your tachometer troubleshooting goes as mine is about 1k slower than it should show all the time
Mine did that for a while. turns out the needle had slipped on the shaft- with the engine off the needle should sit on the lowest mark, not off the bottom of the dial. I pulled it off, applied some thread locker, and reinstalled.

Though I'm probably going to have to pull the needle off again soon.

Hyundai D4BF engine install

Posted: Wed Oct 11, 2017 10:34 pm
by Growlerbearnz
...And it drives!

First impressions: it idles really smoothly, and it's much quieter than the old engine. Something to do with the pistons going up and down rather than side to side I think ;-). The diesel clatter stands out as the loudest noise it makes, where before it was about as loud as the general mechanical cacophony.

It's been a long time since I drove a stock L300, so I don't know if it's more powerful or not. As it was supplied it made 8psi, produced no exhaust smoke *at all*, and the lowest air:fuel ratio I saw was 25:1.

Of course I'm fixing all that. I'm up to 17psi, 18:1 AFR, and still only a touch of smoke on acceleration, and it's *much* better. I'll keep working on it.

UPDATE: The new engine should run well out of the crate, but because I had to swap the accelerator linkage over it needed a bit of tuning. There's a tuning guide here http://www.delica.ca/forum/viewtopic.php?f=100&t=19015 but first, some pictures of how to adjust the linkage if you're a spline or two out:

When installing the D4BF, the Hyundai accelerator lever was swapped for the Mitsubishi lever, and it can be tricky to install it with the splines aligned properly. Here are my notes from adjusting the accelerator lever on its splines:

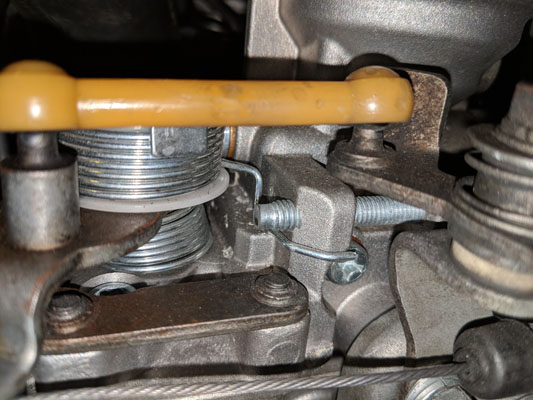
Remove the Hyundai idle speed screw- it's the horizontal screw on the engine side of the injection pump near the top, the accelerator lever will touch it when its at idle. We're using the Mitsubishi idle screw (which is far more conveniently situated at the front) so we don't need the Hyundai one.
IdleScrewDelete.JPG
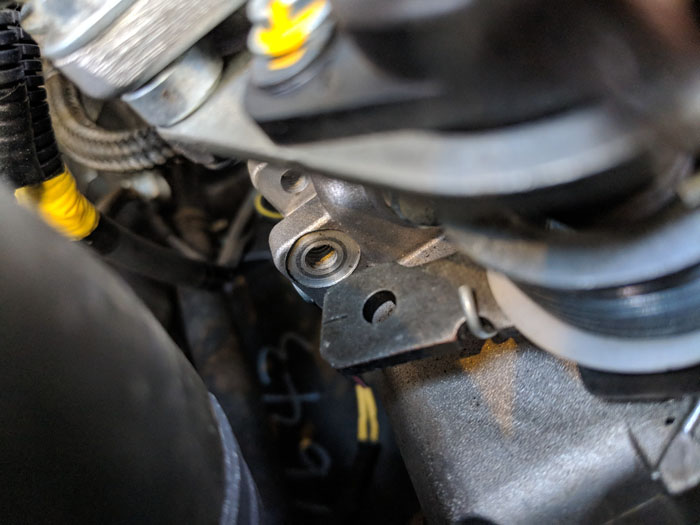
IdleScrewDelete.JPG (76.82 KiB) Viewed 9790 times
IdleScrewDelete2.JPG
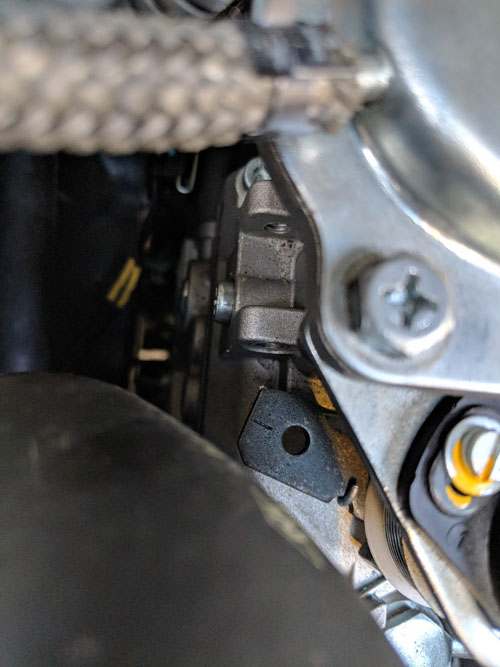
IdleScrewDelete2.JPG (74.41 KiB) Viewed 9790 times
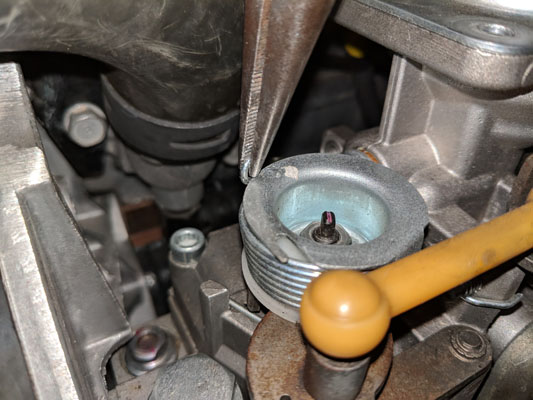
Remove TPS, boot (if fitted), and plastic link nubbin:
RemovingTPS.jpg
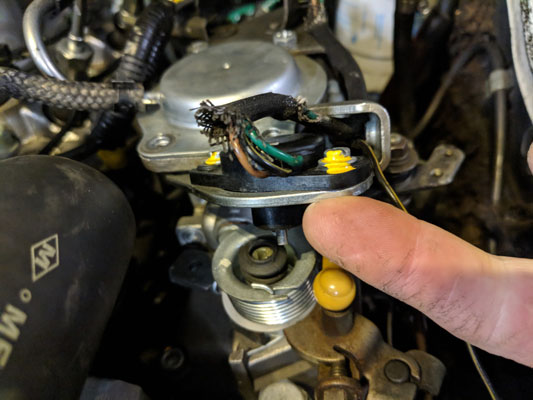
RemovingTPS.jpg (68.08 KiB) Viewed 9746 times
UnderTPS.jpg
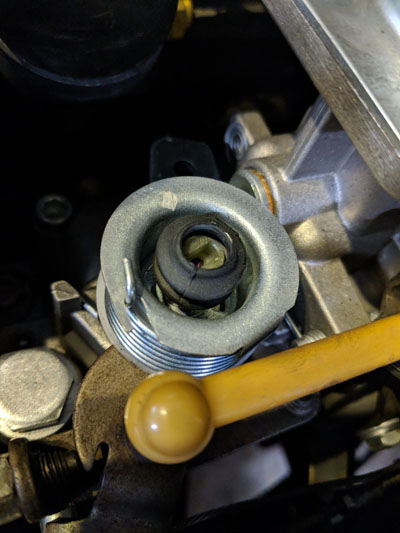
UnderTPS.jpg (59.89 KiB) Viewed 9746 times
LinkNubbin.jpg
LinkNubbin.jpg (58.42 KiB) Viewed 9746 times
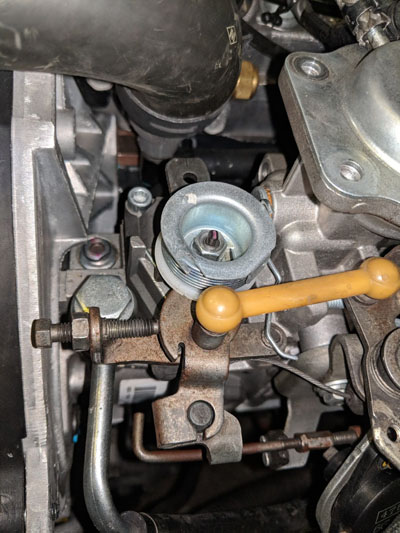
Note where the upper return spring is hooked to the IP body. (Also note the lower return spring's attachment points. It shouldn't come unhooked, but if it does it's good to know how to reinstall it.)
SpringHook.jpg
SpringHook.jpg (73.88 KiB) Viewed 9746 times
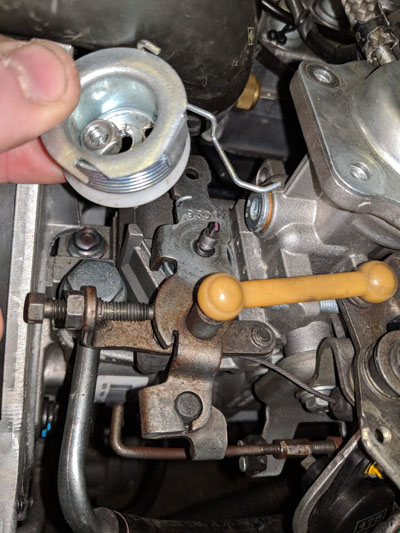
Unhook the return spring from the drum to release the tension.
UnhookSpring.jpg
UnhookSpring.jpg (70.41 KiB) Viewed 9746 times
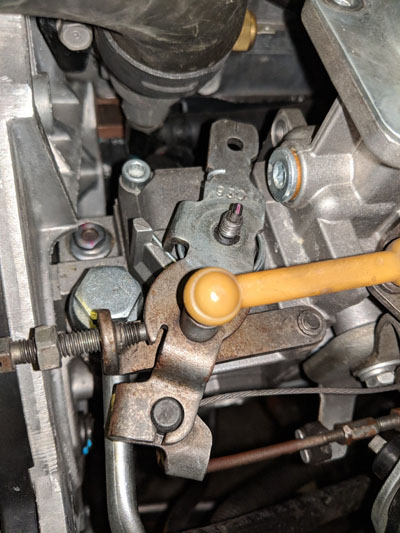
Here's what you're left with: an un-tensioned return spring, and an idle screw that's too long. TAKE NOTE of the alignment of the black splined shaft and the accelerator lever so you can undo any changes if needed.
Original idle.jpg
Original idle.jpg (82.81 KiB) Viewed 9746 times
Undo the 10mm nut and remove the spring, drum, and plastic spacer thingy but BEWARE; the accelerator lever might try and pop up off the splined shaft. Don't let it. At this point you might want to mark the lever with a sharpie to record its alignment with the splined shaft.
Removespring.jpg
Removespring.jpg (84.7 KiB) Viewed 9746 times
While holding the accelerator in the original idle position (and holding it down so it doesn't pop off the splines), wind the idle screw back until it's about 10mm long.
Reposition.jpg
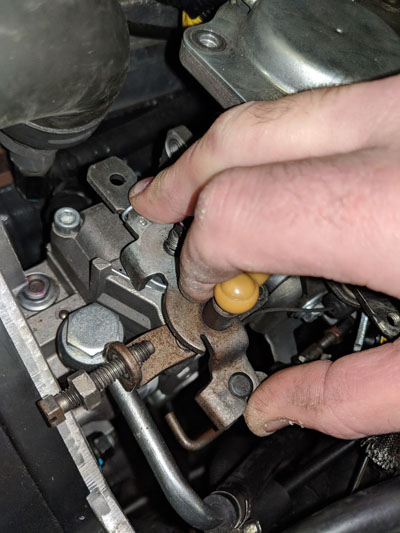
Reposition.jpg (71.04 KiB) Viewed 9746 times
Lift the accelerator lever up just enough to disengage it from the splines. The lower return spring is still in place, so it will be fighting you. Turn the lever until it meets the idle screw, and push it down to re-engage the splined shaft. The splined shaft should not have turned during this operation. (Note that in these pictures, I haven't actually changed the lever's position on the splines, which is why the shaft has turned since the previous picture) The position of the splines might not let you line the lever up perfectly- just get it close, and adjust the idle speed screw later to correct the idle.
Repositioned.jpg
Repositioned.jpg (80.2 KiB) Viewed 9746 times
While still holding the lever down, reinstall the upper return spring and drum, and the 10mm nut. Be sure the return spring's lower hook is in place around the full speed screw- it's a pain to reposition once the nut is on.
Re-engage the return spring's hook with the drum, start the engine, and adjust the idle. Then re-install the TPS.

Start the engine and, if you're lucky, it should idle at 750rpm. If you're a spline or two out, just move the lever again.

Reconnect the accelerator cable- you will need to adjust it so there's free play when the engine's idling. This might be tricky and require bending brackets or finding a longer cable. Same with the kickdown cable- it might take a bit of creative hammering to get the bracket in the right place, and you might have to adjust the length of the linkage to achieve the correct stroke and free play. IF YOU RUN OUT OF ADJUSTMENT on a cable or linkage, you can always turn the accelerator lever back one spline so you can make your idle speed screw longer, and the cable/linkage will be able to reach without having to be at the extreme of its adjustment range.
Accel.Cable.jpg
Accel.Cable.jpg (140.58 KiB) Viewed 9850 times

Hyundai D4BF engine install

Posted: Thu Oct 12, 2017 4:57 pm
by Growlerbearnz
Tachometer issue resolved!

The black wire from the sensor on the IP needs to be connected to earth. On Mitsubishi's engine this is done in the short IP loom, before it even gets to the IP connectors. Hyundai does it elsewhere. Simply remove the Hyundai IP loom, find the two black wires (tachometer sensor earth and IP earth) and connect them together.

:-D

Hyundai D4BF engine install

Posted: Sun Oct 15, 2017 11:57 pm
by Growlerbearnz
And the final touch: new drivetrain mounts all round. The old engine mounts were badly collapsed, the transmission mounts had splits, and the upper transmission mounts were very saggy.
Mounts.JPG
Mounts.JPG (51.53 KiB) Viewed 10933 times
New mounts have made a huge difference. No more knocking noise when turning the engine off, vibration at idle has almost disappeared, as has the slight shudder on takeoff. :-D

Hyundai D4BF engine install

Posted: Mon Oct 16, 2017 5:19 am
by Morgonzo
That's some inspiring stuff GBNZ :-D . It's crazy to see how much those old motor mounts had compressed. How long do think this swap has taken you from start to finish?

Hyundai D4BF engine install

Posted: Mon Oct 16, 2017 9:48 am
by Sylquebec
Thanks for that post. Really inspiring

Envoyé de mon SM-G903W en utilisant Tapatalk

Hyundai D4BF engine install

Posted: Mon Oct 16, 2017 1:04 pm
by Growlerbearnz
Morgonzo wrote:How long do think this swap has taken you from start to finish?
The engine swap took 10 days total, though it probably would have been faster if the van didn't have quite so many modifications.

I'd budget 2 days to remove the old engine, 3 days to swap all the bits from the old engine onto the new one, a day for cleaning the engine bay and flushing out the radiator and oil cooler, and a couple of days to install the new engine.

Hyundai D4BF engine install

Posted: Tue Oct 24, 2017 1:58 pm
by Growlerbearnz
Update at 800km:

The engine's character has changed as it breaks in. Idle is now ridiculously smooth and quiet, and it sits at 750rpm whether cold or hot. It responds to the throttle quickly, and revs to 4100rpm without sounding breathless or thrashy.

Coolant temperatures are stable- about 1/3 on the gauge, moving up to 1/2 when towing a caravan up a steep hill for 10 minutes (where the old engine would have been at about 3/4 or higher).

Exhaust temperatures are 200F/100C lower than before. About 750F/400C cruising at 100kph. The highest I can provoke is 1200F, where the old engine could go above 1400F if I let it.

The new breather oil separator (ProVent 200) is completely, utterly dry. Zero oil is coming out the breather (Hooray for Hyundai's improved oil separator in the rocker cover, I guess).

And the best bit: Still no oil leaks!

Edit: an hour after writing this my automatic gearbox failed. Whoops. Maybe I'll turn the power down a bit.

Hyundai D4BF engine install

Posted: Thu Oct 26, 2017 5:47 pm
by archieim
Can you throw a cost value and time
Approximate....


Sent from my iPhone using Tapatalk

Hyundai D4BF engine install

Posted: Thu Oct 26, 2017 6:54 pm
by Growlerbearnz
I've mentioned it in previous posts, but TL:DR; it took about 10 days (less on a regular, unmodified van) and the engine cost about CAD$5800 shipped to New Zealand.

Hyundai D4BF engine install

Posted: Fri Oct 27, 2017 9:03 am
by lrp374
Growler I know you have gauges for everything!! What is your range for oil pressure?

Thanks

Hyundai D4BF engine install

Posted: Fri Oct 27, 2017 10:02 am
by north54
Growlerbearnz wrote: The new breather oil separator (ProVent 200)
Where did you install your Provent? I think you saw I had mine in the air breather box compartment under the driver seat.

Hyundai D4BF engine install

Posted: Fri Oct 27, 2017 2:44 pm
by Growlerbearnz
lrp374 wrote:Growler I know you have gauges for everything!! What is your range for oil pressure?
Everything... except oil pressure. Sorry.
north54 wrote:Where did you install your Provent?
Yup, same as yours. And you were right- finding room for 25mm pipes was a nightmare! I ended up cutting a new hole for one of the pipes (below the wiring loom hole), and routing them both below the glow relays and around the air box.

Hyundai D4BF engine install

Posted: Fri Oct 27, 2017 6:27 pm
by north54
Hmmm keep in mind I didn't see any oil in the reservoir until after around 1000km of use. It takes a bit of time for oil to travel through those long hoses. It definitely did its job and collected oil eliminating a lot of leaks around the turbo.

I then had a bad oil leak up north where oil was leaking out of the dipstick where it sits in the block. I figured it was due to excess pressure from the long hoses, like you forewarned. I removed the Provent for now till I can find a spot closer inside the main engine bay.

Sounds like you may not even need it anyway with the new engine!

Hyundai D4BF engine install

Posted: Tue Nov 21, 2017 9:48 am
by lrp374
Good Morning Growler - I've got a couple of questions about your new motor:
1. You've indicated you're now running about 17 psi. Do you have any trouble with that pop-valve ( or whatever it's called ) operating or have you disabled or replaced it?

2.Is the waste gate adjustment rod the same as the old engine?

3. Did you need a different lower rad hose because of the angle of the water pump?

4. Did you need to do any external connections to the watercooled turbo?

5. Is it still shiny?