Page 2 of 2
Re: L300 Car Alarm / Remote Start Installation How-To
Posted: Wed Sep 29, 2010 10:51 pm
by Growlerbearnz
Thread hijack!
The clip is under the handle, the usual trick is to shove a blunt-ish screwdriver under the winder handle and turn the handle. The clip will catch on the screwdriver and the drop on the floor, where it will bounce under the heaviest piece of furniture in the room.
Re: L300 Car Alarm / Remote Start Installation How-To
Posted: Thu Sep 30, 2010 6:57 am
by mararmeisto
RichD wrote:Quagmire34 wrote:Am i blind? is there a trick to getting the manual window winder handle off? I cant for the life of me find the steel clip
I have never seen one... no idea! Japanese Delicas are power everything.
If it's not a clip, it might be a set screw (a screw or bolt with no head).
Also, @artacoma - if your shop knows what it's doing, adding the rear gate to lock/unlock feature is not that big of a deal. Sound Solutions on Old Island Highway installed my door locks, with an extra solenoid for the driver's door, without any drawings, and it all works. The rear gate on Monty is set up differently than a Delica (no dash-mounted switch), so that might have made it easier.
Re: L300 Car Alarm / Remote Start Installation How-To
Posted: Fri Nov 05, 2010 5:32 pm
by RichD
Finally getting to this project.

Power Door lock actuator available at Princess Auto:
http://www.princessauto.com/trailer/tru ... word=power
Re: L300 Car Alarm / Remote Start Installation How-To
Posted: Sat Nov 06, 2010 6:05 am
by Golf Cart
Quagmire34 wrote:Am i blind? is there a trick to getting the manual window winder handle off? I cant for the life of me find the steel clip
Most manual window levers have a clip on the back side where it slides onto the splined shaft. You need to push on the door card inward that should expose the clip in behind on the winder. I have electrics, but every manual I ever had that needed removing was done like this.
On one occassion the clip was built into a ring made of the same material as the handle. It almost looks like a big waher in behind that seperates the handle from the door card
Good Luck
( Sorry to hijack the thread Richy)
Re: L300 Car Alarm / Remote Start Installation How-To
Posted: Sun Nov 14, 2010 11:59 am
by RichD
I'll have to work on these posts a bit at a time, edit/update as I come back from the shop with better photos and details.
Central Locks - adding a mechanical control to the driver's side door for central locking from one switch
Got the driver's side door lock installed yesterday, here's the start of that guide.
I
purchased the power door lock actuator from Princess Auto for $10.
- 8008425.jpg (23.29 KiB) Viewed 7868 times
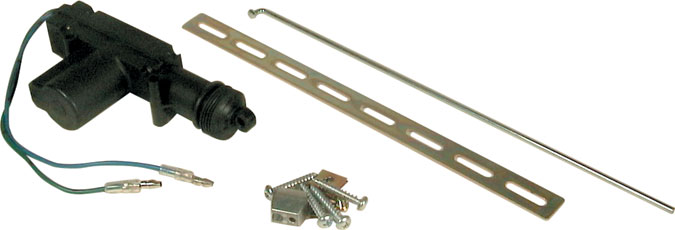
This kit includes:
- a simple servo motor with two wires
- a metal rod that hooks into a hole on the tip of the actuator
- a fastener to join the actuator's rod to the door lock mechanism
- screws that fit the plastic actuator housing perfectly
- some other mounting hardware we won't need in a Delica
The actuator is very simple. If you feed it 12V DC in one polarity it goes one way (unlock), feed it the other polarity and it goes the other way (lock). I installed the actuator directly below the manual push/pull lock knob in the door, up against the inside of the door frame. Here's a step by step:
1) Remove the door panel. (15 mins)
The first time you do it, this job calls for a little finesse so as not to damage the panel. A panel removal tool really helps with this job, but I've done it with a pocket knife and some care.
- Unscrew the manual lock knob
- Remove the two rubber covers in the door handle and unscrew both screws.
- Carefully pry open the plastic cover in the inside door lever and remove the single screw, and the plastic bezel.
- With a flat edge, pop the cover off the inside marker light and remove both screw to free it. Carefully unplug the light fixture from the loom.
- Carefully pry the triangular black plastic cover at the forward edge of the window. it is friction fit with two plastic posts, which could break if you don't finesse it. You should be able to lift one side, then the other and wiggle it out by hand.
- Using a door panel tool, or a sturdy flat blade and some care, pop out all the snap fittings. Try to pry from the door side of the snap fittings so you aren't stressing the door panel, which is really just a piece of thin MDF (i.e. cardboard). Start from the bottom corner and work your way around carefully until they are all out.
- Once the panel is detached, you should be able to grasp it from both ends and lift it off the metal door frame.
- Vapor barrier is attached to the door frame with a black gooey adhesive, which can be manipulated and re-used (it doesn't dry). Carefully detach the vapor barrier and lift it out of your way, or remove it altogether and replace later with a similar piece of plastic.
You have now exposed the lock mechanism (in the door frame on your right) and the wire loom. You are 1/3rd of the way there. Take a look at how the lock works, and open/close your power windows so you can see what kind of space you are working with. Note: The window should be up for this job.
2) Install the actuator (30 mins)
In the L300, you want to mount the actuator against the inside panel of the door frame, well clear of the window glass, and directly below the manual lock lever, which you are going to attach your actuator's arm to.
- Insert the supplied metal rod in the actuator. It needs to be attached before you install the actuator.
- Slide the closed side of the rod fastener onto actuator's metal rod, and thread the screw loosely. Also thread in the other screw now so its handy when you are ready to fasten it to the manual door lock rod.
- Position the door actuator inside the door frame by hand and line it up. The actuator's rod has to be bent to line up with the manual door lock rod; take note of where you are going to want to make that bend, as well as the general location of the mounting holes that will need to be drilled in the door to attach the actuator.
- Make the bend in the actuator rod and line it up again. Remember you need that bend to happen low enough that you can tighten the screws on the rod fastener.
- Make your first hole with a drill bit slightly larger that the provided actuator mounting screws. Use the actuator housing to line up your second hole and make it.
- Now fasten the actuator on the inside of the door with the mounting screws, and attach the actuator rod to the manual lock rod.
- Test the action with the manual lock. Adjust the rod fastener position as needed. Once you have it lined up, you can test the actuator motor with a little power. Switch polarity to change actuator direction.
Once you are satisfied that the mechanism works and all the screws are snugged up, you can move on to the electrical part of the installation.
To Be Continued Next: wiring it up.
Re: L300 Car Alarm / Remote Start Installation How-To
Posted: Mon Nov 29, 2010 10:16 pm
by Quagmire34
Great thanks... Im looking forward to you instructions on the wiring up setup. Im at the same stage, but cannot find the central locking relay. Do you know where this is?
Re: L300 Car Alarm / Remote Start Installation How-To
Posted: Mon Nov 29, 2010 10:50 pm
by RichD
It's actually working! While Felix and I changed the shocks and re-indexed the torsion bars last Saturday, Jay managed to get the remote start, central locks, the alarm and tamper sensor working. I came out from under the truck and he says "where's the remote?"
I'm going to have to get him to give me a tour so I can document the works.
Still lots of finishing touches to do, so plenty of photos to take, but the big pieces are done! Going to combine the hatch and main door locks next, and trigger the works from the hatch lock button on the dash.
The way we did the locks is to use the switch in the driver's door. When I actuate my lock solenoid from the alarm box, it mechanically moves the driver's door lock and this in turn triggers the rest of the door locks.
Re: L300 Car Alarm / Remote Start Installation How-To
Posted: Sun Jan 09, 2011 7:58 pm
by Quagmire34
Ahh think i get what is happening here. If you break the correct wires at that switch, you are effectively cutting off the existing central locking relay box which runs the sliding and rear doors. Once that is done you can insert the one which came with the central locking kit.
Hmm now ive just got to figure out which wires lead to the existing central box. Any chance you can pop out that door switch and show us how the wires are connected?
Re: L300 Car Alarm / Remote Start Installation How-To
Posted: Sun Jan 09, 2011 9:22 pm
by fexlboi
Quagmire34 wrote:Any chance you can pop out that door switch and show us how the wires are connected?
If you need infos from Rich, write him an email as he is not very active at this forum anymore.
Re: L300 Car Alarm / Remote Start Installation How-To
Posted: Mon Jan 10, 2011 11:39 am
by TardisDeli
we didn't touch the drivers door lock wiring, just added the actuator to that door so that when you hit the alarm control and lock the drivers door it would send the signal to lock the other two doors. Then we disconnected the wiring from the rear tailgate door switch and connected it to the alarm ,catch is i havn't figured out how to keep the tailgate door switch wired in as its not compatible with the alarm wiring, it kept blowing fuses every time we hit the alrm switch.Cheers Jay TardisDeli
Re: L300 Car Alarm / Remote Start Installation How-To
Posted: Mon Jan 10, 2011 11:51 am
by thedjjack
TardisDeli wrote:wcatch is i havn't figured out how to keep the tailgate door switch wired in as its not compatible with the alarm wiring, it kept blowing fuses every time we hit the alrm switch.Cheers Jay TardisDeli
how about two Diodes at the back door?
Re: L300 Car Alarm / Remote Start Installation How-To
Posted: Mon Jan 10, 2011 2:50 pm
by TardisDeli
Won't help the problem is the tailgate door switch itself, in its ''middle/off ''position its circuit is closed ,so when you hit the alarm switch it blows a fuse.I would change the switch but the problem is finding a switch that will fit in that hole ,which is not a standard size.
Re: L300 Car Alarm / Remote Start Installation How-To
Posted: Mon Jan 10, 2011 6:33 pm
by FalcoColumbarius
What about simple door contacts?

Falco.
Re: L300 Car Alarm / Remote Start Installation How-To
Posted: Tue Jan 18, 2011 11:22 am
by RichD
Apologies for orphaning this thread but I have my reasons for losing confidence in the site moderation. I'll probably reboot this thread on another site and cross link it for you. Jay/TardisDeli is the master installer here; I highly recommend you hire him to do your alarm installation.
Here's the schematic that I proposed to Jay for the final configuration. We haven't implemented this yet, but essentially it uses a reversing switch in the dash (Jay says the stock switch won't work as it shorts in the resting position, which is very weird), and supports central locking. All locks including the hatch lock/unlock together.
Note that below we connect directly to all four actuators. I have deleted the stock door lock "brain box" and the automatic locking trigger in the driver's side door, as they conflict with the reversing switch and I feel it necessary to have a switch to control the locks in-dash.
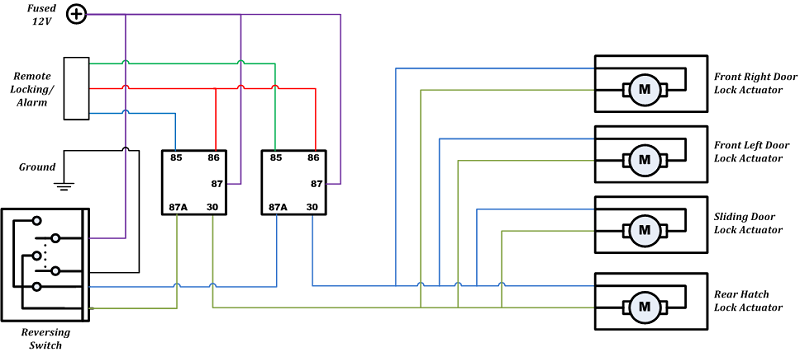
- PowerLocks.png (52.57 KiB) Viewed 7561 times