Page 1 of 1

Bench -> Bed hinges

Posted: Thu Jan 26, 2012 10:29 pm
by jessef
Courtesy of David's searching.

Most people have either owned (usually many) or rode/slept in an old VW bus.

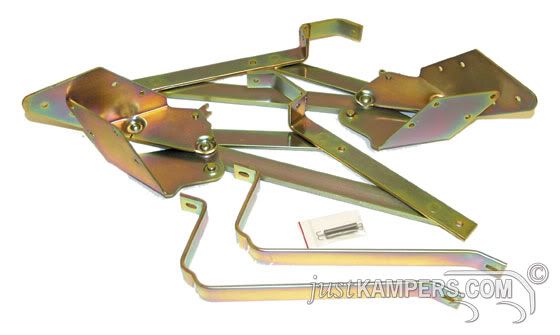
The rear bench seat that morphs into a bed platform is genius and the parts are available to make your own. I remember someone wanted these specific hinges but can't find the thread. This application would make for a nice platform in both L300/L400's.

Cheers

http://www.busdepot.com/details.jsp?partnumber=98553

Plans and walkthrough on samba

http://www.thesamba.com/vw/forum/viewtopic.php?t=352049
EDragnDean wrote:Finding the measurements or any directions for installing a rock and roll bed, z-bed (yes I know it is not a z bed, but many call it that), is nearly impossible, and the measurements included are incorrect/not sufficient. Hope you find the informantion usefull (YMMV), and I attached links to two other write ups which include similar information (I didn't find the second until after I was finished, thanks type2.com members for the link).

I made two modifications for my application which I will address and you may/may not wish to do. I wanted a slight recline for comfort, and I wanted an easily removable bed so mine attaches to the t-bolts and the previously installed seat belt mounts. I also made my seat base longer so that the bed would be longer for me. Both attached links show cut out handles, I found it just as easy to use the support brackets to open and pull the seat base forward.

Parts required
* Hinges from Just Kampers (UK) or Bus Depot (US)
* 2 -- 3/4 inch 4x8 sheets of ply -- I used birch from Home Depot
* Bolts/screws -- need quite a few, I used stainless, and longer ones for the brackets.
* 2 -- 4ft angle iron, I used it for connection points, you could use wood etc.
* 1 -- 4ft u-channel alum strip for a cap to protect from the mounts on the front facing.
* pretreatment, stain, sealer.
* Drill bits, tape measure, circular saw, jig saw.

Have you lumber supplier cut the large pieces, it will save you a lot of time, and you will have straight long cuts.

Image

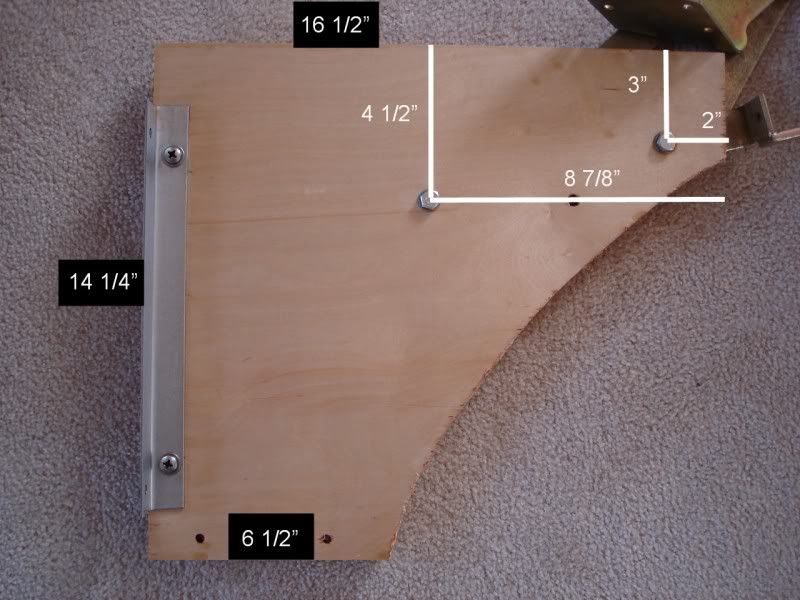
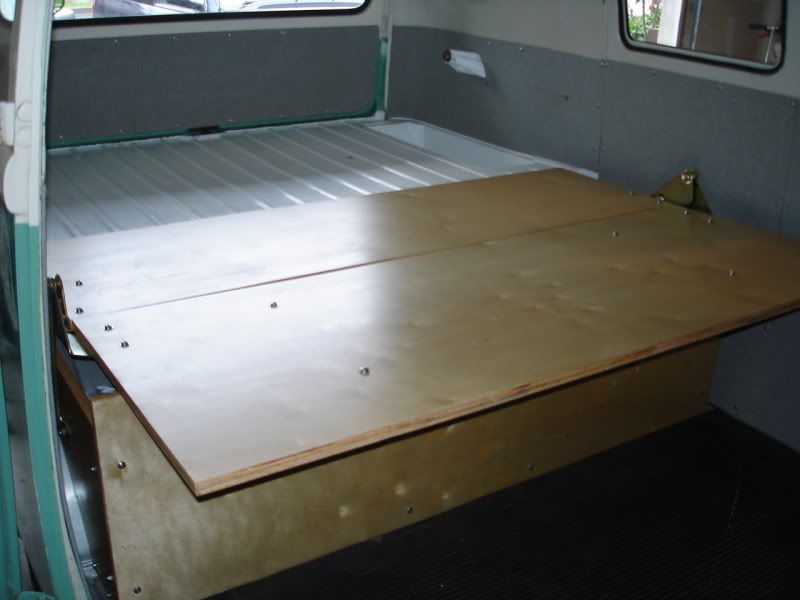
Start with your side supports, this is the only really challenging portion. Cut two 14 1/4 by 16 1/2 pieces and scribe your wheel arch with the jig saw, i used one of my interior panels as a pattern (If you are not using a base piece, add 3/4" to the 14 1/4). Then drill your rear most hinge hole, line up your hinge to make sure your front hole is in the right location and drill the second (if you don't wish your seat to have a recline, drop the front bolt down about a 1/4 inch).

Image

You will be tempted to increase the width of your bed, don't. 55" is the maximum you can go with these hinges, the reason is the bus narrows towards the roof. 55" barely clears my pop out latches, I may have clearance issues when I add the foam pads/upholstery, so you may even wish to go with 54"

Image

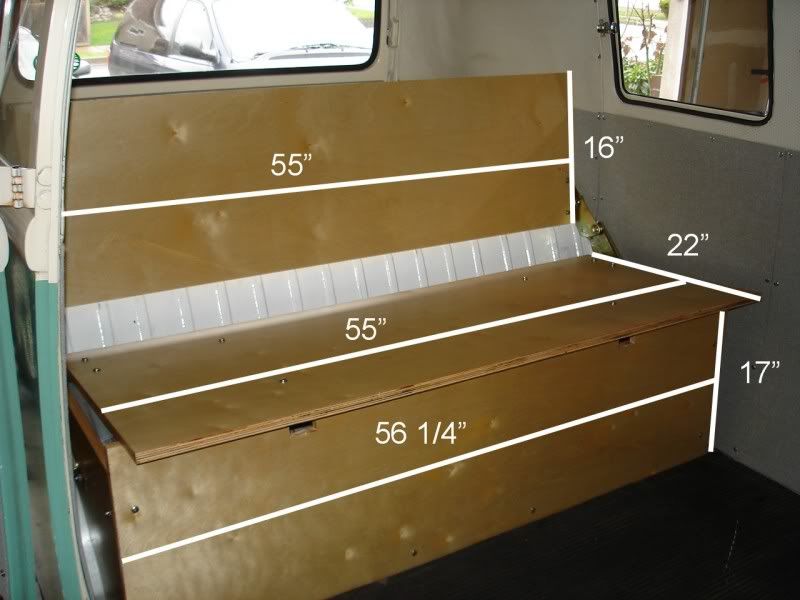
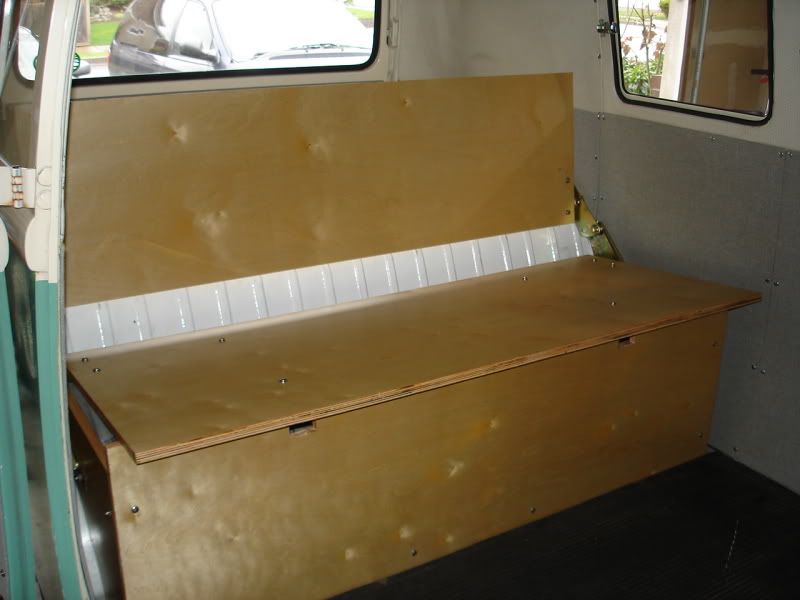
Assemble the basic box before you work with the seat base and seat back. Bottom, sides, then front. My base is designed to attach to the t-bolts, sides sit on top of the base, but the front goes in front of the base, for visual. Then install the seat base and seat back.

Image

Image

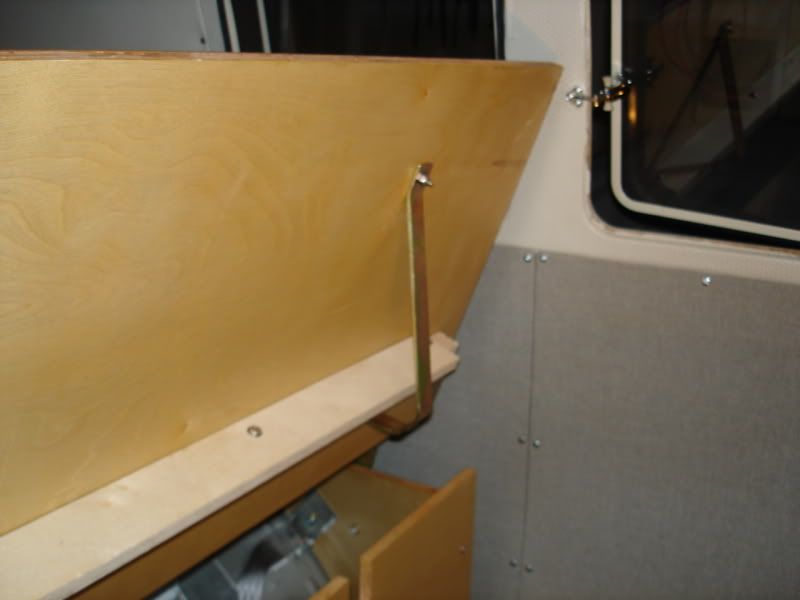
Finally decide where cross support and support brackets will be located. you will need to measure the gap when flat to get the right height of the cross support. I added a second taller cross piece in front of the cross support to add additional front tilt support. Once you determine the location of your metal support, you can notch the front panel to accomodate the support bracket, this is designed to keep the bed from falling/tilting forward when you sit on the edge.

Image

Image

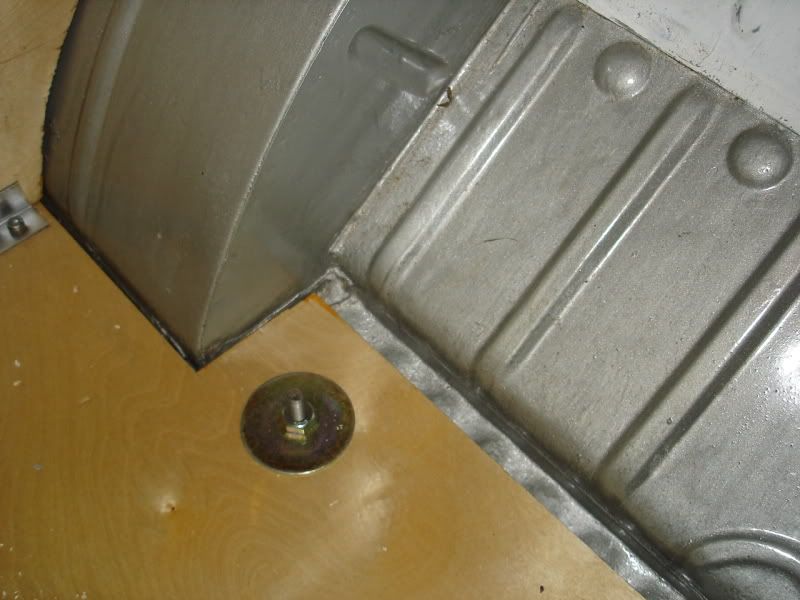
I cut a rectangle where my t-bolts install to hold down the OG seat, and the t-bolt slides in as originally designed, add a large fender washer and it installs easy.

Image

Instead of drilling another hole and attaching the rear of the hinge, I used 90 degree metal and attached my side plates to my existing seat belt mounting plate. If you are not adding seatbelts, bolt the back side of the hinge, however, don't forget that the gas tank is directly behind that mounting location.

Image

Good luck, let me know if you need any clarification, feel free to add your own opinions or share any critisism or better ideas.
Dean

http://www.aircooledtech.com/camper_int ... d_install/
http://volkswagens.wikia.com/wiki/How_w ... _split_bus

Re: Bench -> Bed hinges

Posted: Fri Jan 27, 2012 8:32 am
by EnviroImports.com
Nice find Jess!! 8-)

Re: Bench -> Bed hinges

Posted: Fri Jan 27, 2012 9:55 am
by glenn
Yes, great find! The westfalia rear bench is the benchmark for this kind of seat. I've been mulling over how I would do this since I got my van. Seat belts are the next thing to figure out - I often fill my van with people.

Re: Bench -> Bed hinges

Posted: Fri Jan 27, 2012 10:26 am
by konadog
I loved the bed in my old 71 VW. I got the whole Westfalia interior but for the pop-top and the cooler/sink for $100.00 at Malahat wreckers - what a deal. A few years after I had sold it I saw it for sale. The guy who had it had reupholstered that old interior and it looked better that even. That old bus looked better than even in general too. Never saw it after that. Still haven't got around to making a proper setup in my delica - be nice if I could pay $100.00 for a bolt straight in option like I did with the the old 71...

Re: Bench -> Bed hinges

Posted: Fri Jan 27, 2012 10:46 am
by jessef
Cheers guys. I'm already drawing up plans for a westy interior downsized about 70% to fit in our Chamonix. Opposite config but same cabinetry.

I didn't want to use an existing westy interior as it's too bulky and opposite side config. Busdepot is a magical place for vw gear, odds and ends that any owner would think to themselves.. They still make this 30 years later?!? :-D

Re: Bench -> Bed hinges

Posted: Fri Jan 27, 2012 12:54 pm
by CREGAN
jfarsang wrote: Busdepot is a magical place for vw gear, odds and ends that any owner would think to themselves.. They still make this 30 years later?!? :-D
I don't mean to make this into a VENDOR thread, but for good reads and really cool VW parts I always try to go to VanCafe and GoWesty as well. All three sell the coolest repalcement crap for my westy. Not cheap but they do have sales. For a laugh look at the GoWesty vehicle sales and check out the prices for a fully restored Westy. Who doesn't have between 35-60 thousand dollars to throw around! One of these 3 vendors used to send a couple mini bags of chocalate chip cookies with their order. It was a way to help smooth things over with your wife when she see's the bank statement :?

Craig

Bench -> Bed hinges

Posted: Fri Jan 27, 2012 2:31 pm
by delicat
Don't tell Jesse you found a link way back for cool parts, he'll harass you till you you find it back. Pain in the neck! ;-p

But those hinges were worth the search, reminded me of the good old times...

Cheers,
Mr. D


Image

Image

Image

Image

Re: Bench -> Bed hinges

Posted: Fri Jan 27, 2012 2:45 pm
by CREGAN
delicat wrote: reminded me of the good old times...

Image

Image

Image

Image
That is a really sweet van. I love it! I take it you had to part with it. As much as I love my Westy and my Deli, I would give anything to have a sweet old split like that one.

Craig

Bench -> Bed hinges

Posted: Fri Jan 27, 2012 3:17 pm
by delicat
I guess I've been spoiled in the past... ;-)

Image

Re: Bench -> Bed hinges

Posted: Fri Jan 27, 2012 3:47 pm
by CREGAN
Wow! That is quite the collection. Is there a "what else have you driven" thread here in the forum?

Craig

Re: Bench -> Bed hinges

Posted: Fri Jan 27, 2012 9:34 pm
by delicat
Not really, well maybe this one in my case...
http://www.delica.ca/forum/delicat-s-ne ... -7552.html

But no need to hijack the thread... 8-)

Re: Bench -> Bed hinges

Posted: Fri Jan 27, 2012 9:35 pm
by jessef
delicat wrote:Not really, well maybe this one in my case...
http://www.delica.ca/forum/delicat-s-ne ... -7552.html

But no need to hijack the thread... 8-)
Hey. It has the seal of approval from Putin so it's golden !

Re: Bench -> Bed hinges

Posted: Sun Mar 18, 2012 4:18 pm
by righthandman
So glad to find this thread! I've just purchased an old Z-bed (in a lovely yellow-green tartan, from '73 Westy, from wrecker in Langley, $125, he has more) to go in my 91 L300 Exceed. I will be building a simple platform over the rear wheel wells to sub for the VW's rear engine platform. I will be undertaking the conversion in the next month or so, and may come searching for help once I'm over my head. One of the main questions I have is about seatbelts. I am planning on removing all original seats (two captains and rear bench- any takers?) and so I want the Z-bed to have legal working seatbelts (3 if possible). Does anyone know how to do this? Can this be done with existing anchors, or will I be drilling though the van floor to place carriage bolts? Are there pitfalls to be avoided?
I will take some photos along the way as the carnage ensues, any advice much appreciated :-) .
Cheers,
Peter
ps: anyone replaced the carpeted flooring with something more muddy-dog-proof?

Re: Bench -> Bed hinges

Posted: Sun Mar 18, 2012 5:11 pm
by nxski
I can't comment on the seating but I have replaced my floor with rubber.

You can check it out here...

http://www.delica.ca/forum/hermione-s-m ... 06-45.html

Re: Bench -> Bed hinges

Posted: Sun Mar 18, 2012 9:49 pm
by jessef
Peter

It's my understanding that you have two options.

Use the existing seatbelts in the stock configuration and just replace the seat section.

Have new seat belts installed in new locations and have it inspected by a certified shop.

The first is the most realistic.