Page 1 of 1
Replacing lightbulb in heater control unit - how to?
Posted: Sun Jan 16, 2011 6:39 pm
by verticalgrain
I need to replace the bulb in my heater control unit so I can see my controls at night. I have the manual kind, with cables (see pic below).
Last night I took apart the dash, removed the stereo and glove box, etc, but couldn't pull out the heater control unit due to the cables in the rear. I couldn't figure out how to remove the cables, and couldn't see any place to pull out a bulb.
Any tips here? Is there something I'm missing?

Re: Replacing lightbulb in heater control unit - how to?
Posted: Sun Jan 16, 2011 7:33 pm
by jessef
If you open the glove box and take out the plastic box/liner, look up and to the right(center). You'll see the heater push/pull cable with a metal o-ring on the end that just rests on a push/pull pin. Lift it off the pin and you'll be able to remove the heater console (after removing the screws holding it in).
Re: Replacing lightbulb in heater control unit - how to?
Posted: Sun Jan 16, 2011 8:56 pm
by chris
vertical, I have the same problem and looked to mdocuk for answers when we first got the van. Of the handful who have done it, they say it was a pain to get the cables off the heater. Once you do that the two bulbs can be removed as described here:
http://www.mdocuk.co.uk/forums/viewtopic.php?t=124 There are other posts there too if you search on heater lights or heater bulbs. That's why I'm excited about Jesse's tip.
One other post mentions that you want to have the replacements in hand before doing it so you don't have to drive around with a dismantled heater. Do you have any idea of where to get the bulbs?
Thanks for asking the question and thanks Jesse for the tip!
Chris
Re: Replacing lightbulb in heater control unit - how to?
Posted: Sun Jan 16, 2011 10:47 pm
by Percy
I have a 94 L400 and I did not realize that there was a light on the controls that would be very handy to have. I have zero mechanical knowledge, so where would I go to get this fixed. My wife just read this post and wants it fixed if possible.
Re: Replacing lightbulb in heater control unit - how to?
Posted: Mon Jan 17, 2011 9:50 pm
by chris
I gave it a try and 20 minutes later I had the heater control in my hand. I'm going to assume everyone knows how to remove the centre trim piece as it is explained elsewhere.

- IMGP1797.JPG (32.46 KiB) Viewed 5753 times
Push the side clips into the glove box and lower it. You can see up to the right behind the heater control box.
- IMGP1796.JPG (17.57 KiB) Viewed 5753 times
You will see this pin. It will have a cable on it. It controls the hot/cold.
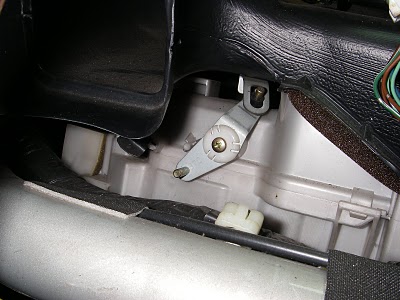
- IMGP1782.JPG (34.61 KiB) Viewed 5753 times
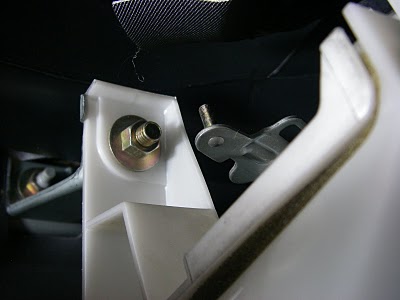
From the front you can see this pin. It controls the fresh air on the face blue arrow thing. The cable has been removed here too.
- IMGP1798.JPG (28.75 KiB) Viewed 5753 times
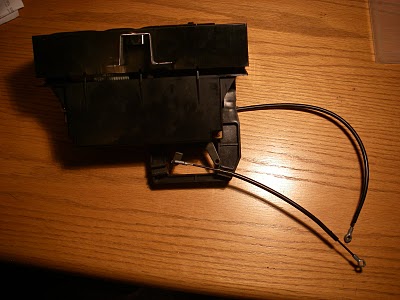
Take the two cables off the pins. They are also secured by a clip near the loop. Remove the four screws on the front of the control unit. Unplug the two electrical connectors. The box will pull out. Note the loops visible on the two cables.
- IMGP1783.JPG (24.35 KiB) Viewed 5753 times
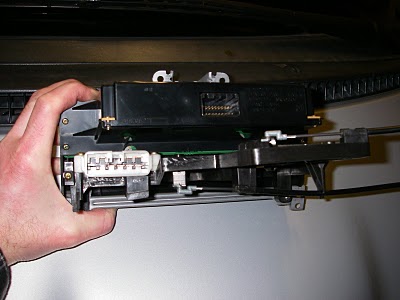
The back of the control box. Remove the four screws on the part covering the electronics.
- IMGP1784.JPG (42.06 KiB) Viewed 5753 times
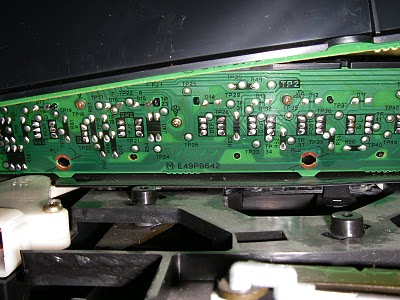
The circuit board revealed. The two holes at the bottom house the bulbs, The bulbs twist out.
- IMGP1785.JPG (13.75 KiB) Viewed 5753 times
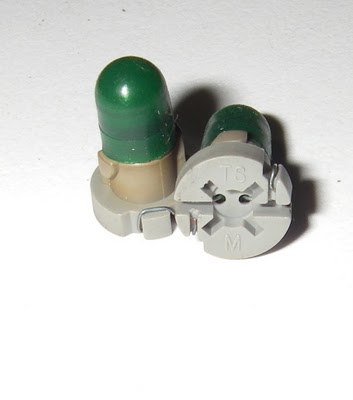
The bulbs featuring green rubber covers.
Thank you jfarsang!
Re: Replacing lightbulb in heater control unit - how to?
Posted: Mon Jan 17, 2011 9:55 pm
by chris
Mods this can be deleted. I fit two posts into one but there is a bug in the window where you type your post. After a while the cursor will not scroll down and you cannot see what you are typing. Thanks.
Re: Replacing lightbulb in heater control unit - how to?
Posted: Mon Jan 17, 2011 11:50 pm
by jessef
It's nice to see others do the step by step via pictures.

Thanks !

Re: Replacing lightbulb in heater control unit - how to?
Posted: Tue Jan 18, 2011 1:30 am
by fexlboi
Thanks Chris! Any chance you can upload the photos straight to the forum? Otherwise people are going to find your great how-to post in a year or two with broken external photos.
Re: Replacing lightbulb in heater control unit - how to?
Posted: Tue Jan 18, 2011 9:47 pm
by verticalgrain
You guys rule, thanks for the detailed and precise how to. With pictures even. This is awesome, I am going to do this asap.
No idea where to get the bulbs. Thanks for the photo of the bulbs. Very odd size and shape indeed. I was hoping to get a replacement at Canadian Tire but this looks like a more specialized bulb.
Edit: To pull some information from the other thread mentioned earlier, the bulbs can be obtained from Maplin, and electronics supplier in the UK. The part numbers (for various colors) are:
clear BT43W
red PG78K
green PG79L
blue PG80B
yellow PG81C
Re: Replacing lightbulb in heater control unit - how to?
Posted: Tue Jan 18, 2011 10:33 pm
by chris
Vertical, Engerland is too far.
The green covers come off the bulbs and the bulbs come out of the grey bases. You need those bases. I went to an electronics supply shop today with the base and got bulbs for $1.25 each. The originals are 12 volt, 4 mm wide (at the top of the bulb - the base is narrower), 9 mm long not including the wire tails. I couldn't get an exact replacement in town so I went a bit smaller with something called an L22 bulb. Installed them tonight and it's pretty much changed my life. I didn't use the green covers because the smaller bulbs aren't as bright. Get the bulb that is closest to these dimensions. If you go too big the bulb won't fit in the base or the hole.
Two reassembly tips - before you attach the cables and screw in the unit, plug in the two connectors and turn on the lights to make sure it works. Also for the hot/cold cable, put the loop over the pin and slide all the way to cool before pushing the cable in the clip. This sets it up the right way and keeps the loop on the pin.
Percy - you and Mrs. Percy can do this! The hardest part is removing the centre console and the connectors and that is easy to do if you are careful.
