Front hub matinance
-
rdub

- Posts: 261
- Joined: Wed May 23, 2007 7:18 pm
- Member's Photo Album: http://www.delica.ca/Photos/
- Location: aldergrove
Front hub matinance
Ive had manual locking hubs before and was able to service them ,but im wondering how the procedure goes for auto locking hubs and is ther anything i should be looking for or replacing while i have them torn apart. Also does anyone have a part # for front bearings. 
I am stable in most situations that I have no reservations in stormy conditions.
-
delicat

- Posts: 2331
- Joined: Thu Jul 26, 2007 6:26 pm
- Member's Photo Album: http://www.delica.ca/Photos/
- Vehicle: '92 Exeed '93 Safari '94 Pajero
- Location: New Westminster, BC
- Location: New Westminster, BC
Re: Front hub matinance
Rdub,
Look at the following, it might help. AutoFreeHubs Removal and WheelBearing Adjustment:
http://community.webshots.com/album/359792027RPuxHZ
Hope it will get you started.
Cheers!
Look at the following, it might help. AutoFreeHubs Removal and WheelBearing Adjustment:
http://community.webshots.com/album/359792027RPuxHZ
Hope it will get you started.
Cheers!
'93 Nissan Patrol
'94 Mitsubishi Pajero

"If it ain't broken, modify it!"
'94 Mitsubishi Pajero
"If it ain't broken, modify it!"
-
rdub
- Posts: 261
- Joined: Wed May 23, 2007 7:18 pm
- Member's Photo Album: http://www.delica.ca/Photos/
- Location: aldergrove
Re: Front hub matinance
Great link thanks the only thing it did not seem to mention was re-packing the bearings,other than that, it seems pretty straight forward.
I am stable in most situations that I have no reservations in stormy conditions.
-
Mystery Machine
- Posts: 510
- Joined: Fri Dec 08, 2006 12:06 pm
- Location: Bristol (UK)
Re: Front hub matinance
I'm currently in the process of rebuilding my front hubs (auto locks and F&R bearings) because mine got some serious grief on the last off-roading weekend.
On one tricky part climbing some wet rocks on a steep hill, my front hub gave out a really loud CRACK! Over the following 1,000 miles the front hub started getting noisier to the point the other day when I started to hear loud clunking!
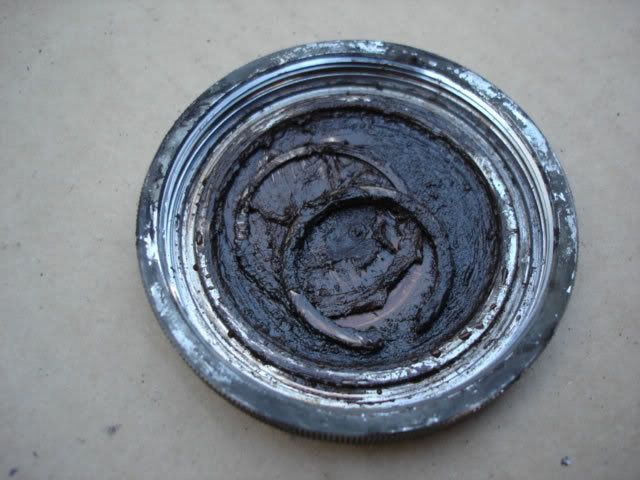
I was only 1/2 mile from home so I drove back and started stripping the hubs down. I took the cap off the hub and the first thing I noticed was all the brown gunk/gravel in there!!! Somewhere the seal must have given way allowing mud & dirt into the hubs.
On the inside of the cap I saw the circlip/snap ring that should have been holding the driveshaft in the hub. With this off the hub, the driveshaft can move back & forth allowing dirt into the hub....
.....and as I removed the auto lock (full of gunk and unidentifiable debris) and bearing plates things got a LOT worse!
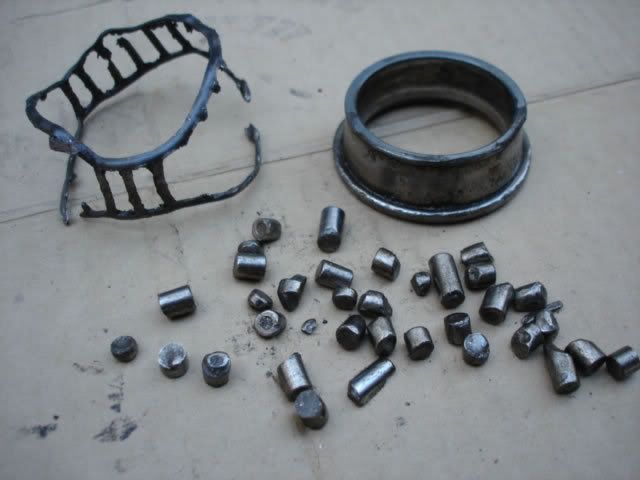
This was the remains of the front bearing (after being washed in white spirit) and is exactly how it looked when I removed it - albeit a lot cleaner!
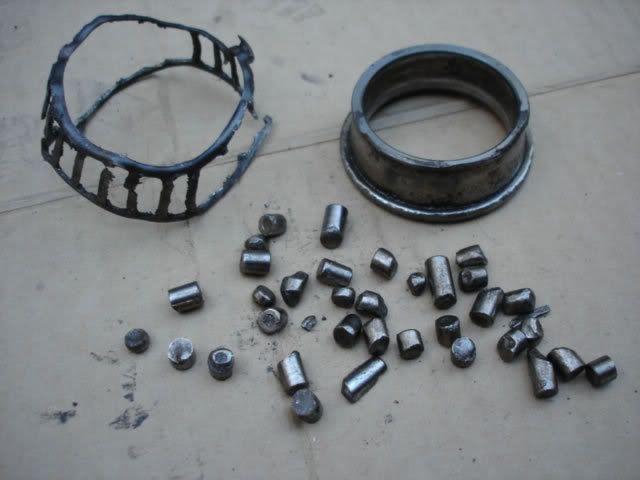
Obviously all the noise was caused by the gravel in the hub....and the clunking was the bearing breaking down! Luckily most of the damage seems to have occured close to home and I am currently pulling the bearings out of my L400 (which I am parting out) to see if they will fit the L300....
I might see if I can swap the whole hub assembly over from the L400 to save me having to buy new rear seals - these are a 'single fit' seals so need to be replaced if removing the rear bearing....and also because I think the bearing falling apart may have damaged/scored the inside of the L300 hub. I will be doing more work on this today so will report back with what I find....work in progress I guess.
I have sourceed some (free) replacement auto locks because I know mine will be shot with all that gunk in there. At the weekend I am planning to fit replacement driveshafts, hubs, auto locks - everything! I may even see if I can fit some L400 brakes while I am at it (twin piston)....so the front axle will have a whole new lease of life ready for the next outing of the Mud Monkey....
Bruce.
P.S. I have uploaded this for you if it is any help at all??
On one tricky part climbing some wet rocks on a steep hill, my front hub gave out a really loud CRACK! Over the following 1,000 miles the front hub started getting noisier to the point the other day when I started to hear loud clunking!
I was only 1/2 mile from home so I drove back and started stripping the hubs down. I took the cap off the hub and the first thing I noticed was all the brown gunk/gravel in there!!! Somewhere the seal must have given way allowing mud & dirt into the hubs.
On the inside of the cap I saw the circlip/snap ring that should have been holding the driveshaft in the hub. With this off the hub, the driveshaft can move back & forth allowing dirt into the hub....
.....and as I removed the auto lock (full of gunk and unidentifiable debris) and bearing plates things got a LOT worse!
This was the remains of the front bearing (after being washed in white spirit) and is exactly how it looked when I removed it - albeit a lot cleaner!
Obviously all the noise was caused by the gravel in the hub....and the clunking was the bearing breaking down! Luckily most of the damage seems to have occured close to home and I am currently pulling the bearings out of my L400 (which I am parting out) to see if they will fit the L300....
I might see if I can swap the whole hub assembly over from the L400 to save me having to buy new rear seals - these are a 'single fit' seals so need to be replaced if removing the rear bearing....and also because I think the bearing falling apart may have damaged/scored the inside of the L300 hub. I will be doing more work on this today so will report back with what I find....work in progress I guess.
I have sourceed some (free) replacement auto locks because I know mine will be shot with all that gunk in there. At the weekend I am planning to fit replacement driveshafts, hubs, auto locks - everything! I may even see if I can fit some L400 brakes while I am at it (twin piston)....so the front axle will have a whole new lease of life ready for the next outing of the Mud Monkey....
Bruce.
P.S. I have uploaded this for you if it is any help at all??
L300 Mystery Machine (High Altitude Edition  )
)
L300 MudMonkey ($400 bargain banger!! )
)

L300 MudMonkey ($400 bargain banger!!
-
mararmeisto

- Posts: 3276
- Joined: Wed Sep 19, 2007 10:00 am
- Vehicle: 2018 Ram EcoDiesel
- Location: Dartmouth, NS
Re: Front hub matinance
O U C H ! ! ! !
Some of the round-like things weren't so much any more... no wonder it was making that 'weird' noise.
Interesting point about the retro-fitting L400 parts onto your L300 - are there many parts that can 'go back'? Is the L400 mostly a coachworks redesign, or was the chassis and drive train dramatically changed as well? Just wondering.
I think it's telling that you're parting out the L400 and repairing the L300. What is the consensus on the D5? As good/better than the L300?
JPL
I still miss my '94 Pajero!
I still miss my '94 Pajero!
-
TardisDeli

- Posts: 1425
- Joined: Tue Sep 18, 2007 10:57 pm
- Member's Photo Album: http://www.delica.ca/Photos/
- Vehicle: 1991 L300. 1997 L300.
- Location: Burnaby
- Location: Burnaby, Gaglardi freeway exit
- Contact:
Re: Front hub matinance
Hi Rdub, First job we tackled was replace front brakes and repack the bearings. I did the repacking part, the other bodies underneath the Tardis did the brake bit, we were supervised by a Delica expert, as we wanted to learn how to do stuff ourselves. I am trying to remember it. Warning: I am not a mechanic, and I may have the wrong info, but In My Mind this is what I did. Follow along ...
The bearing is a beautiful thing, its large like a doughnut, maybe 3 to 4 inches across. Has a doughnut like hole in the centre. The body of this doughnut is made up of beautiful little stainless steel rods about 1 inch long each, and rollers that are held in place by the doughnut shell. DO NOT take it apart, keep your doughnut intact.
Do NOT not wash it in solvent. If you do you must ensure every bit of solvent is removed before repacking the grease, or it will break down the grease (said the Expert). Instead, take several paper towels and rub the rods (think of the bearing as a large eraser, erasing against the palm of your hand, as if you were erasing dry paint from the palm of your hand, which is of course gloved and holding the paper towel). Keep changing paper towel until all clean of the old ugly black grease. Admire it, all shiny.
Change the gloves now, as dont want to contaminate the new grease. Take some bearing grease (we used a very pretty pink gloop that we use on all our boat trailer axles, I can get the name if you need). Smear about a tablespoon at a time into your gloved non-dominant hand. Holding the doughnut in your gloved dominant hand, push and turn the doughnut against your palm, repeat gloop, repeat pushing the gloop into the rods. Again think of the doughnut as a large eraser. You want to force gloop into all the little air spaces. I probably used about 4 ounces (1/2 a Cup in kitchen measurements) gloop to do both.
Re-assembly is the reverse of dis-assembly. The only tricky bit is careful when you are about to remove the the bearing, there is a flat metal ring that "clicks" into the ring. Notice how it sits in nice and flush, as it has a little pokey-out bit that must be aligned properly when you put it all back together (else it won't sit nice and flush).
That's it. Very satisfying project. But take heaps of time, as we spent about 5 hours , yeah, it was hunting for tools to adapt that took time. Had to keep hunting for very deep sockets, making something to undo the hub, couldnt find something the right size to undo the hub top (like a large screw top lid, tried oil filter wrenches, pipe wrenches etc) , dealing with seized nuts and bolts, wishing we had the impact wrench (it was at home, but we did not do this at our home), trips to Canadian Tire to try for some alternate tools.
I don't know if could do just the hubs without needing special tools, one of the online experts would know. I did have the printout from the website on how to do it step=by=step with photos but the guys wouldnt use it (hmmmm) - but when I read it again after the EVENT, there were a lot of hints there that would have saved much agro.
That's my 2 pennies worth of technical lingo. Note we did not have all the little bits like the photos from Bruce of the Mystery Machine. Good Luck. cheers, Christine of the TardisDeli.
-
jrman

- Posts: 506
- Joined: Thu Aug 16, 2007 12:29 pm
- Member's Photo Album: http://www.delica.ca/Photos/
- Vehicle: 1991 MMC Delica Exceed - Scoobus
Re: Front hub matinance
Bruce...you've got the best diagrams / photos out there.
I've started my own archive of these...may I never have to use them!
I've started my own archive of these...may I never have to use them!
Sean in North Van
1991 Delica Exceed - Scoobus
1991 Delica Exceed - Scoobus
-
Mystery Machine
- Posts: 510
- Joined: Fri Dec 08, 2006 12:06 pm
- Location: Bristol (UK)
Re: Front hub matinance
The L400 is very different from the L300 (not even mentioning that it is not as sturdy/tough/rugged!!) and a lot of the parts are very different. However, I do have the luxury of being able to rob parts off my L400 'breaker' to try out on my L300. This is more as a convenient way of keeping mine on the road, as well as a cost saving exercise and just something interesting to try while I have the opportunity. Hopefully in years to come, when L300 parts are harder to come by, I'll have a catalogue of all the bits that can be 'retro fitted' in order to keep my L300's on the road.mararmeisto wrote:Interesting point about the retro-fitting L400 parts onto your L300 - are there many parts that can 'go back'? Is the L400 mostly a coachworks redesign, or was the chassis and drive train dramatically changed as well? Just wondering.
With L400's outnumbering L300's about 15:1 here in the UK, knowing what parts will fit is always going to be handy....and a lot of them, although different can often be modded to fit. By the weekend, I will hope to know if L400 calipers/caliper carriers/hubs and driveshafts will fit on an L300? It's a bit of a 'mix&match' thing....but you never know? "If you don't try...."
Thanks Dude - appreciate your comments!jrman wrote:Bruce...you've got the best diagrams / photos out there.
I've started my own archive of these...may I never have to use them!
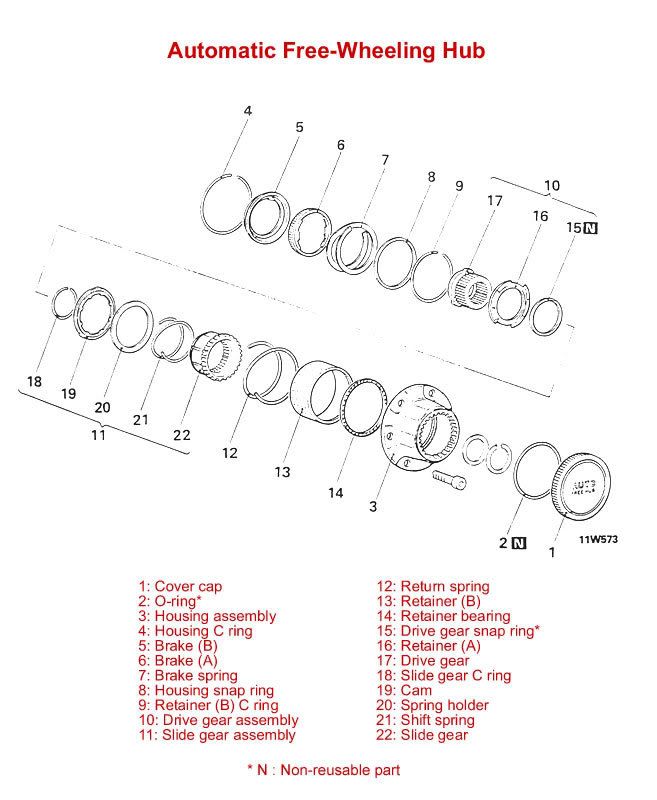
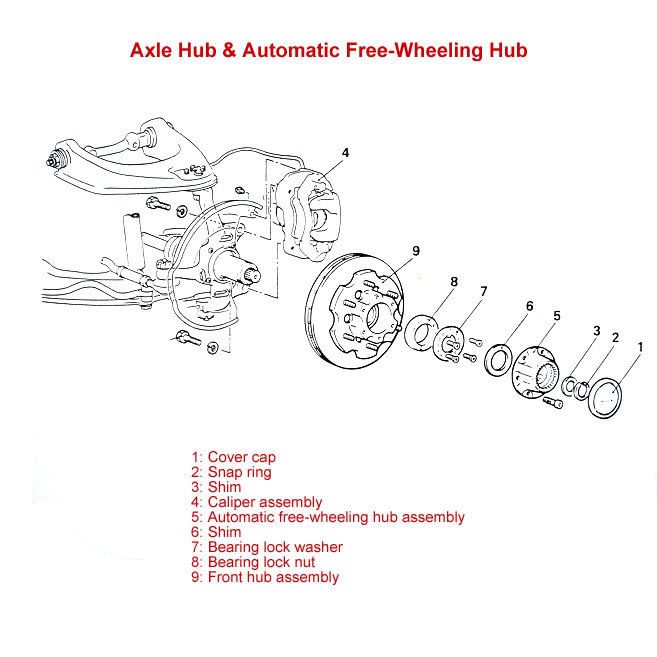
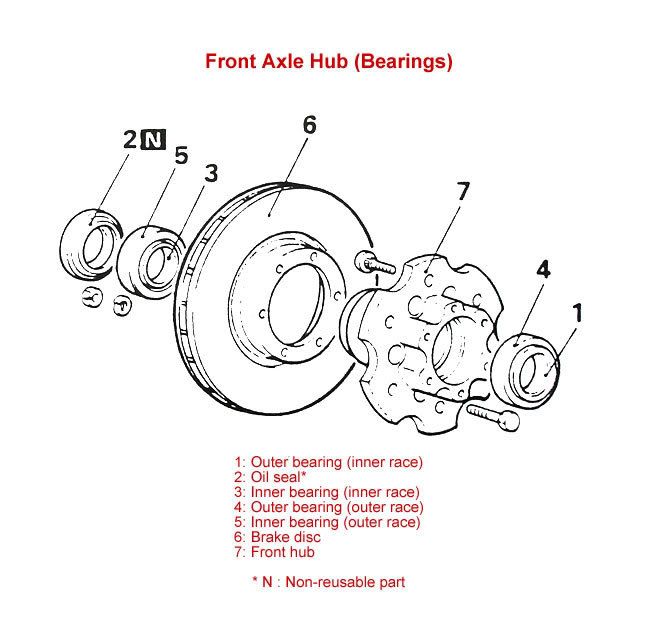
They are genuine Mitsy diagrams that I photograph, then bleach out the 'paper' colour, adjust the contrast and add my own text to make them nicer to view. Each one takes about half hour to do but I reckon they are worth it. It's enjoyable to do - but with over 8,000 diagrams here in my study, I doubt I'll be getting them all done sometime soon!
Rdub,
Here are some more diagrams that I did for you this morning...
I've got some more for you to help you out - along with some technical info, but won't have time in the next few days because I've got a big contract to finish (should be on it now, but this is more fun!)
I'll also have some 'hands on' info after the weekend when I strip down and rebuild my front hubs/brakes etc....
L300 Mystery Machine (High Altitude Edition )
L300 MudMonkey ($400 bargain banger!! )
L300 MudMonkey ($400 bargain banger!!