L400 T-case shifter replacement & in-field fix

Mitsubishi Delica L400 production commenced in 1994 -- After much anticipation, the L400 arrived on Canadian Soil in 2009!
Post Reply
User avatar
jaggedfish
Posts: 593
Joined: Fri Jan 04, 2008 8:47 am
Member's Photo Album: http://www.delica.ca/Photos/
Vehicle: 95 Crystal Lite SWB Exceed
Location: Davis Bay, BC

L400 T-case shifter replacement & in-field fix

Post by jaggedfish »

Preamble…Last time we were out 4-wheeling, I had a problem with my transfer case shifter (the one for 4WD). We had been blazing around in some deep snow and when it came time to shift back into 2WD the shifter was jammed. It had been a little difficult to shift previously but I had put it down to lack of familiarity with my new bus and the shift pattern on the knob was incorrect (aftermarket shifter). I tried for all I could to get the shifter to move but it wouldn’t so we decided to continue along the snow covered road to a spot where we could have lunch. During lunch I tried again and the shifter ended up breaking inside the transfer case. Crap! This left me stuck in 4WD-Locked and, faced with the fact we would be going back to hard pavement, the decision was made to pull the shifter out and attempt to manually shift it out of 4WD-locked. With the help (and tools) from other members, we managed to get the t-case shifted into the AWD mode which can be used on hard pavement and reassembled so the group could carry on playing for the afternoon.

As it turns out, there may have been an underlying problem that was causing the difficulties leading up to the final failure of the shifter. Here I would like to document the replacement of the shifter assembly and how to resolve the issue should anybody experience the same problem I did.

The fix…The shifter replacement (and in-field repair) can be done from inside the van. No need to drop the transfer case out of the van. Firstly, if you are doing this in the field, be highly aware that any bolts and washers removed can easily be dropped through the opening in the floor to the ground so it is a good idea to lay something underneath to catch them (especially in snow).

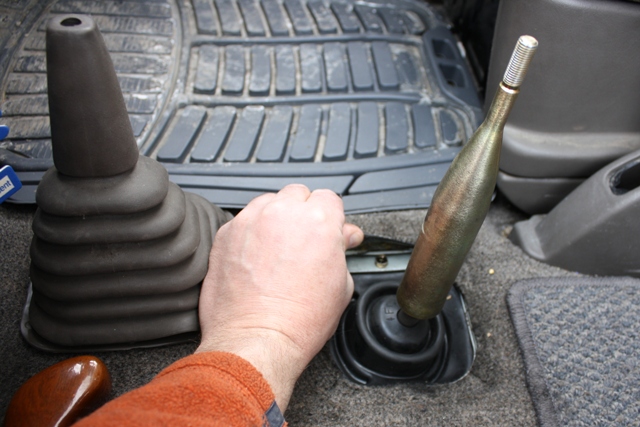
Remove the shifter knob… it just unscrews from the top of the shifter lever.

Under the carpet, there is a metal plate with 6 bolts (10mm) which will need to be removed. In my picture, I had left the grey shifter boot off from the field repair. Normally, the bottom of the boot would be fitted under the metal plate. Remove the metal plate and the shifter boot.
1- Stick remova.JPG
1- Stick remova.JPG (149.96 KiB) Viewed 2145 times
2- Stick removal.JPG
2- Stick removal.JPG (161.25 KiB) Viewed 2145 times
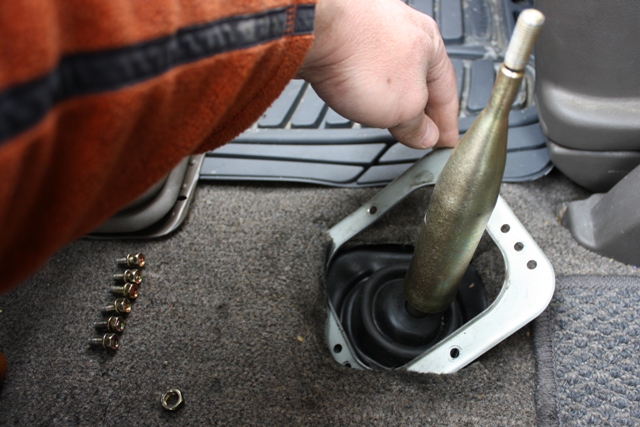
There is a second black rubber boot that seals the hole in the floor of the van. Pull this back out of the way. It stays on the shifter assembly. This will reveal the top of the transfer case.
3- Stick removal.JPG
3- Stick removal.JPG (159.75 KiB) Viewed 2145 times
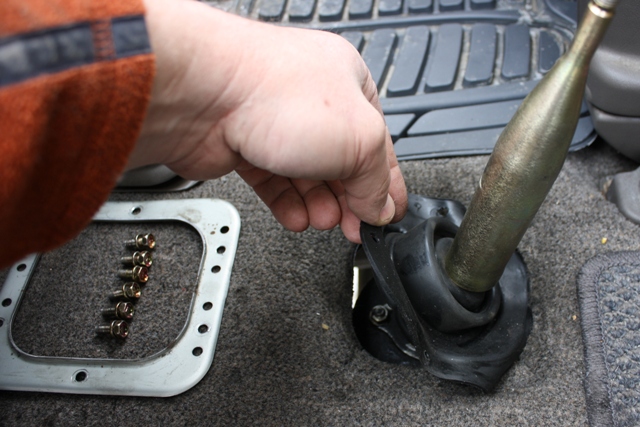
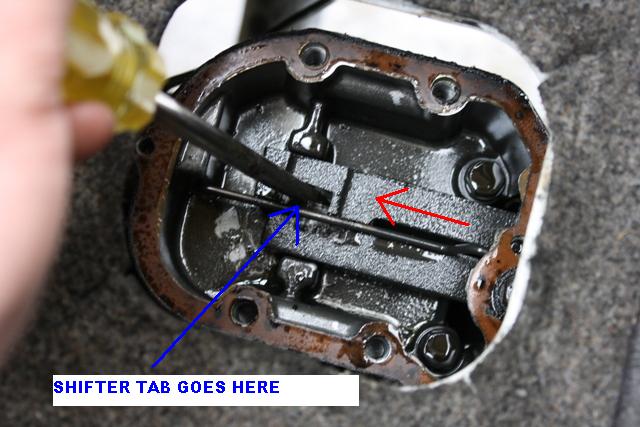
To remove the shifter assembly from the transfer case, you will need to remove the 4 bolts (12mm) on the larger of the 2 plates. DO NOT remove the 3 nuts on the top triangular-ish shaped plate as these 3 bolts could fall inside the transfer case if they happen to be loose.
4- Stick removal.JPG
4- Stick removal.JPG (49.19 KiB) Viewed 2145 times
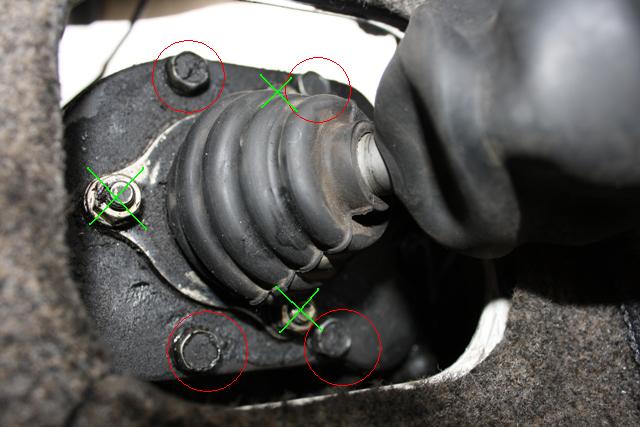
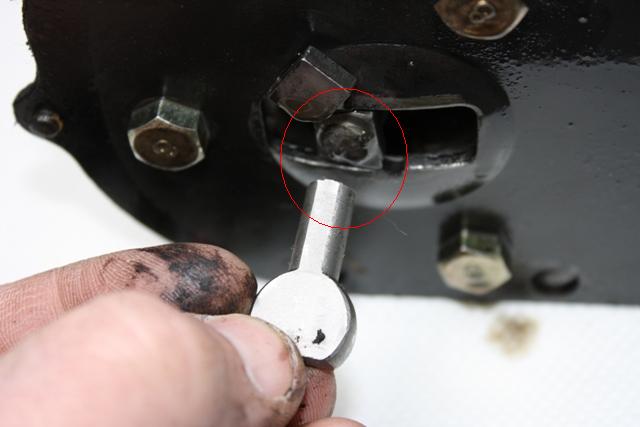
This picture shows my problem… the lower tab had broken off of the stick inside the transfer case. The break appeared as though it had been cracked for some time and I assume it must’ve bent when I shifted into 4WD the final time and caused it to jam and subsequently break.
5- Yup its broke.JPG
5- Yup its broke.JPG (32.82 KiB) Viewed 2145 times
If you are stuck in the field and need to get your bus shifted back into AWD or 2WD mode, it can be done with a screwdriver. In the picture, the front of the van is to the left (driver’s side at the top). Pushing the linkage towards the front of the van will get you out of the locked positions and into AWD or 2WD so you can drive it home. You will still need to re-install the shifter prior to driving home though.
6- Manual shifting.JPG
6- Manual shifting.JPG (59.58 KiB) Viewed 2145 times
More to come...
Please check us out at http://www.beachsidebythebay.com or visit our Beachside by the Bay Facebook page.
User avatar
jaggedfish
Posts: 593
Joined: Fri Jan 04, 2008 8:47 am
Member's Photo Album: http://www.delica.ca/Photos/
Vehicle: 95 Crystal Lite SWB Exceed
Location: Davis Bay, BC

Re: L400 T-case shifter replacement & in-field fix

Post by jaggedfish »

Comparing my new shifter (thanks to CCAuto) with the broken one reveals a significant difference in the manufacture of the large shifter plate. The tab welded to the bottom of the plate on the broken shifter was welded at an angle whereas the tab on the replacement shifter is square to the slot in the plate. The corner of the tab on the old one had actually been worn off over time. I am unsure if this would have ultimately caused issues but the difference is suspect to me.
7-Comparison.JPG
7-Comparison.JPG (129.87 KiB) Viewed 2142 times
8- Comparison.JPG
8- Comparison.JPG (39.13 KiB) Viewed 2142 times
After installing your new shifter with the round tab in the spot where the screwdriver is located in the picture above, reinstall the four 12mm bolts and tighten them. Make sure the black rubber boot sits on top of the floorboard but under the carpet. Put the metal plate over the outer boot so the bottom portion of the boot is under the plate.
9- Reassembly.JPG
9- Reassembly.JPG (53.75 KiB) Viewed 2142 times
The trickiest part of this whole process is to line up the holes of the plate, upper boot, lower boot and the threaded holes in the floor before re-installing the six 10mm bolts. I can definitively say that you will need to be up on your knowledge of foul words as you will need all of them to complete this part of the task. Then reinstall the shifter knob and test to make sure all works fine.
10- Reassembly.JPG
10- Reassembly.JPG (124.06 KiB) Viewed 2142 times
Once completed, reward yourself by polishing your knob… :?
11- Finished.JPG
11- Finished.JPG (107.15 KiB) Viewed 2142 times
Cheers!
Ian
Please check us out at http://www.beachsidebythebay.com or visit our Beachside by the Bay Facebook page.
User avatar
jessef
Posts: 6459
Joined: Tue Feb 26, 2008 1:27 pm
Vehicle: JDM flavour of the month
Location: Vancouver
Location: Vancouver, BC

Re: L400 T-case shifter replacement & in-field fix

Post by jessef »

Nice write up Ian :M
User avatar
tonydca
Posts: 646
Joined: Tue May 19, 2009 9:01 pm
Member's Photo Album: http://www.delica.ca/Photos/
Vehicle: 95 L400 Exceed - yeah, baby!
Location: Vancouver BC

Re: L400 T-case shifter replacement & in-field fix

Post by tonydca »

[quote="jaggedfish']
... You will still need to re-install the shifter prior to driving home though....
[/quote]

Nicely done!

Curious tho' - why would you actually need to re-install that shifter if you were just going to leave it in, say, AWD until you get to the shop? ('cuz it'll just have to all come off again)

Just askin'...
Cry "Havoc!" and let slip the elementary-school-aged boys...
User avatar
jaggedfish
Posts: 593
Joined: Fri Jan 04, 2008 8:47 am
Member's Photo Album: http://www.delica.ca/Photos/
Vehicle: 95 Crystal Lite SWB Exceed
Location: Davis Bay, BC

Re: L400 T-case shifter replacement & in-field fix

Post by jaggedfish »

jfarsang wrote:Nice write up Ian :M
tonydca wrote:Nicely done!
Thanks guys! :-D
tonydca wrote:Curious tho' - why would you actually need to re-install that shifter if you were just going to leave it in, say, AWD until you get to the shop? ('cuz it'll just have to all come off again)
I had wondered if someone would ask this question - a good one. Basically, the linkage chamber is a lubricated chamer. If the opening in the top of the transfer case is left open, the fluid will leak or spray out causing a giant mess for one and, if left long enough, could cause eventual failure of the transfer case due to lack of lubrication. On the other side of the coin, the open hole will let foreign particles into the top of transfer case and into the fluid which would end up being circulated through which could cause damage also.

It's really a matter of sealing the hole and the best way to do it is to bolt the shifter plate (and thus the shifter, as they are an assembly) back in place. At the time, I chose to bolt the boot plate back on as well (minus the upper boot) to prevent road grime and cold air from coming through to the cabin as I knew I would have to wait for the part anyway and still needed to drive to work, etc.

Cheers!
Ian
Please check us out at http://www.beachsidebythebay.com or visit our Beachside by the Bay Facebook page.
User avatar
tonydca
Posts: 646
Joined: Tue May 19, 2009 9:01 pm
Member's Photo Album: http://www.delica.ca/Photos/
Vehicle: 95 L400 Exceed - yeah, baby!
Location: Vancouver BC

Re: L400 T-case shifter replacement & in-field fix

Post by tonydca »

Thanks for explainin'. I feel much better now...

Cheers!
Attachments
Humour_HarHarSeal.jpg
Humour_HarHarSeal.jpg (57.42 KiB) Viewed 2041 times
Cry "Havoc!" and let slip the elementary-school-aged boys...
Post Reply

Return to “L400 Technical”